Montelukast PowerPoint Template


No items found.
Montelukast PowerPoint Template Preview
Montelukast PowerPoint Template Content
Slide 1 - Montelukast Introduction (Title Slide)
.avif)
- Introduces the presentation on Montelukast using a modern blue and mint color scheme.
- The slide prominently features a stylized graphic of the drug's packaging, clearly communicating the presentation's core subject to the audience without delay.
Slide 2 - Montelukast Content (Navigation)
.avif)
- Structures the talk on Montelukast.
- The slide uses numbered blue circles and bold headings to ensure clear navigation and an organized flow.
Slide 3 - Montelukast Drug Profile (Introduction)
.avif)
- Section introduction to transition smoothly into the Drug Profile segment.
- The slide features a large, simple graphic of two blue medical tablets.
Slide 4 - Montelukast Drug Profile (Key Facts)
.avif)
- Summarizes the three most critical facts about Montelukast, including its function, uses, and important safety information.
- The slide design clearly separates complex medical details into easily digestible sections, using numbered blue circles.
Slide 5 - Introduction to Montelukast (Overview)
.avif)
- Presents the three essential facts about Montelukast: its function, primary uses, and critical safety warnings.
- The slide features a dynamic, angled graphic of the drug's packaging.
Slide 6 - Montelukast Pharmacology (Introduction)
.avif)
- Seamlessly introduces the Pharmacology section, setting the stage for a detailed scientific discussion of Montelukast.
- The design features a prominent, abstract illustration of the drug's molecular structure, visually signaling to the audience the scientific focus of the upcoming content.
Slide 7 - Montelukast Pharmacology (Identity)
.avif)
- Displays the fundamental identity of the drug.
- The slide design splits the information into two color-coded mint arcs, highlighting the Montelukast name and its formula.
Slide 8 - Montelukast Pharmacology (Detail)
.avif)
- Presents the Chemical Formula alongside key explanatory details about Montelukast's pharmacology.
- The slide features a large, central molecular structure graphic emerging from a stylized cloud.
Slide 9 - Montelukast Market (Analysis)
.avif)
- Presents and analyzes the Montelukast market breakdown, immediately communicating complex data visually.
- The large, colorful pie chart utilizes five distinct segments (33%, 31%, 28%, 4%, and 4%).
Slide 10 - Montelukast Indications (Introduction)
.avif)
- Smoothly transitions the presentation to the crucial Indications section of the Montelukast discussion.
- The design features a large, clear illustration of the human lungs and bronchial system.
Slide 11 - Montelukast Symptoms (Treatment Overview)
.avif)
- Presents the four primary conditions Montelukast treats: asthma, exercise-induced constriction, and seasonal or perennial rhinitis.
- The slide features four distinct icons (lungs, running figure, flowers, and nose with a clock) that visually represent each condition.
Slide 12 - Montelukast Demonstrations (Uses)
.avif)
- Demonstrates and details the four key clinical applications of Montelukast, including specific asthma and rhinitis treatments.
- The slide isolates the four conditions into clean, framed cards, each featuring a distinct icon (lungs, runner, flowers, nose).
Slide 13 - Respiratory System Anatomy (Context)
.avif)
- Provides an anatomical context, detailing the key components of the human respiratory system relevant to Montelukast's function.
- The design features a large, schematic illustration of the torso, trachea, and lungs, with distinct lines pointing to six labeled structures including the Larynx, Trachea, and Diaphragm.
Slide 14 - Normal and Asthmatic Airway (Comparison)
.avif)
- Demonstrates the stark difference between a Normal Airway and an Asthmatic Airway.
- The design uses a powerful cross-section graphic, splitting the vessel to show a healthy structure on the left and the thickened, inflamed structure, mucus plugs, and inflammatory cells on the right.
Slide 15 - Asthma Mechanism (Process)
.avif)
- Shows key steps of the asthma mechanism using a simple, effective visual process.
- The design features a large, cross-sectional illustration of the Bronchi, graphically representing the narrowing of the airway and the presence of Mucus.
Slide 16 - Asthma Pathogenesis (Trigger and Reaction)
.avif)
- Explains how asthma is triggered, showing the resulting contraction and narrowing of the small airways within the bronchioles.
- The design features an enlarged, vibrant cross-section of a Bronchiole, highlighting the Trigger mechanism and the buildup of Mucous for clear anatomical focus.
Slide 17 - Montelukast Off Label Use (Introduction)
.avif)
- Transitions to the discussion on Montelukast's Off Label Use, signaling a shift to specialized applications.
- The design features a stylized illustration of a hand with two large blue spots, a common visual metaphor for skin conditions.
Slide 18 - Montelukast Associated Conditions (Off-Label Uses)
.avif)
- Presents four associated conditions where Montelukast might be used, including Sleep Apnea and specific dermatological issues.
- The design uses four distinct, numbered cards with unique icons (sleeping person, hands with spots).
Slide 19 - Obstructive Sleep Apnea (Mechanism)
.avif)
- Defines Obstructive Sleep Apnea and explains its fundamental mechanism.
- The design features a large, side-profile illustration of the head and throat.
Slide 20 - Atopic Dermatitis (Pathology)
.avif)
- Explains the underlying pathology of Atopic Dermatitis, focusing on the role of allergens, the skin barrier, and inflammation.
- The design features a compelling cross-section graphic of the skin layers.
Slide 21 - Atopic Dermatitis (Mechanism Detail)
.avif)
- Explains the underlying pathology of Atopic Dermatitis, focusing on the role of allergens, the skin barrier, and inflammation.
- The design features a compelling cross-section graphic of the skin layers.
Slide 22 - Montelukast Contraindications and Precautions (Safety)
.avif)
- Lists the six major contraindications and precautions for Montelukast, including Acute Asthma and Neuropsychiatric Events.
- The slide uses a clear, organized layout featuring six mint-colored warning icons (exclamation point triangles).
Slide 23 - Montelukast Warnings and Precautions (Detailed Safety)
.avif)
- Explains six critical warnings associated with Montelukast, including risks for Aspirin Sensitivity and Neuropsychiatric Events.
- The slide organizes the safety information using six distinct circles, each featuring a relevant icon (pill, inhaler, brain image).
Slide 24 - Montelukast Restrictions and Limits (Summary)
.avif)
- Summarizes the three primary restrictions for Montelukast use, focusing on risks related to Aspirin Sensitivity, Phenylketonuria, and Eosinophilic Conditions.
- The slide features three prominent, clearly defined cards, each with a unique icon.
Slide 25 - Montelukast Restrictions and Limits (Detailed Warnings)
.avif)
- Presents three further critical restrictions related to Montelukast, including concerns regarding Corticosteroid Use, Acute Asthma, and Neuropsychiatric Events.
- The slide uses three visually strong icons (inhaler, pill, and brain illustration) within framed cards.
Slide 26 - Montelukast Pharmacodynamics (Action)
.avif)
- Explains the positive effects of Montelukast, demonstrating the before-and-after change in the patient's airways.
- The slide features a large illustration of the lungs next to two cross-sections of a bronchiole, clearly contrasting the constricted airway Before using Montelukast with the wider, unobstructed airway After using Montelukast.
Slide 27 - Montelukast Pharmacodynamics (Detailed Mechanism)
.avif)
- Explains the rapid onset of Montelukast and its precise mechanism of action on the airways.
- The design features a large, flowing illustration of the bronchial tree.
Slide 28 - Montelukast Pharmacodynamics (Key Facts)
.avif)
- Presents the two most critical facts about Montelukast's mechanism: its fast action and its specific receptor target in the body.
- The slide features a dynamic, magnified illustration of the bronchial system.
Slide 29 - Leukotrienes Mechanism of Action (Cellular Process)
.avif)
- Explains the start of the inflammatory response, detailing how the cell membrane releases the core molecules that trigger inflammation.
- The design features a large illustration of a Mast cell membrane, showing the key interaction where Phospholipids are broken down to liberate Arachidonic acid due to inflammatory stimuli.
Slide 30 - Leukotrienes Mechanism of Action (Formation)
.avif)
- Explains the next step in the inflammatory process, detailing how Arachidonic acid is rapidly converted into the final Leukotrienes.
- The design features a compelling illustration showing the conversion process driven by the Lipoxygenase (LOX) enzyme.
Slide 31 - Leukotrienes Mechanism of Action (Receptor Binding)
.avif)
- Explains the final inflammatory step: how leukotrienes bind to airway cells to cause symptoms.
- The design features a compelling diagram showing the Leukotrienes molecules binding specifically to the CysLT1 receptors located on the membrane of the Airway Cells.
Slide 32 - Montelukast Mechanism of Action (Drug Binding)
.avif)
- Explains how Montelukast directly targets and blocks the inflammatory response in the airways.
- The design uses a powerful diagram to illustrate the entire cellular process, showing Montelukast binding selectively to the CysLT1 receptor on Airway Cells and inhibiting the action of LTD4.
Slide 33 - Montelukast Absorption (Introduction)
.avif)
- Transitions to the crucial Absorption section, detailing how Montelukast is processed by the body.
- The design features a prominent illustration of the human digestive system, visually signaling to the audience the focus on the movement and uptake of the drug.
Slide 34 - Montelukast Absorption (Key Data)
.avif)
- Presents the three most important pharmacokinetic facts about Montelukast absorption following oral administration.
- The slide uses a central human silhouette surrounded by three icons to visually represent the rapid absorption, the achievement of peak concentration (3 to 4 hours), and the mean oral bioavailability (64%).
Slide 35 - Montelukast Absorption (Key Data Summary)
.avif)
- Summarizes the three most vital facts about the drug's uptake: rapid absorption, achievement of peak concentration in 3 to 4 hours T-max, and the 64% oral bioavailability.
- The design organizes the data using three large, stacked icons (stopwatch, curve graph, oral cavity).
Slide 36 - Montelukast Protein Binding (Distribution)
.avif)
- Explains the final, critical step in the drug's journey through the body: how Montelukast distributes and binds to plasma proteins.
- The design features a compelling illustration showing Montelukast molecules interacting with Plasma Proteins in the Blood Vessel.
Slide 37 - Montelukast Metabolism (Liver Processing)
.avif)
- Explains how Montelukast is processed by the Liver, detailing the specific enzyme systems responsible for its metabolism.
- The design features a large, schematic illustration of the Liver, highlighting the interaction of Montelukast molecules with the three key cytochrome enzymes CYP3A4, 2C8, and 2C9 that break down the drug.
Slide 38 - Montelukast Metabolism (Byproducts)
.avif)
- Details the extensive nature of Montelukast's breakdown, presenting the specific Drug Byproducts formed during the metabolic process.
- The slide features a large, stylized illustration of the Liver, reinforcing the fact that the metabolism is catalyzed by CYP enzymes.
Slide 39 - Montelukast Route Of Elimination (Excretion)
.avif)
- Explains the final journey of the drug, detailing the primary Route Of Elimination for Montelukast and its byproducts from the body.
- The design features a large illustration of the human digestive system, highlighting the Gall Bladder to visually indicate that drug metabolites are almost exclusively excreted through the bile.
Slide 40 - Montelukast Half-life (Time in Body)
.avif)
- Communicates the drug's duration of action, presenting the mean plasma half-life of Montelukast as $2.7 to 5.5 hours in young adults.
- The design features a compelling illustration showing drug molecules (Bound Drug) within the Blood Stream alongside a clock graphic.
Slide 41 - Montelukast Half-life (Concentration Curve)
.avif)
- Demonstrates the plasma concentration curve of Montelukast over time.
- The chart clearly plots Concentration ng/ml against Time h, marking the Peak Concentration and specifically illustrating the half-life period between 2.7h and 5.5h.
Slide 42 - Montelukast Clearance (Processing Rate)
- Communicates the rate at which Montelukast is removed from the body, specifying the plasma clearance rate of 45 mL/min in healthy adults.
- The design features a compelling illustration of the Liver and Gall Bladder, showing Montelukast molecules being processed and excreted via the bile, visually connecting the organ function to the clearance rate.
Slide 43 - Montelukast Severe Adverse Effects (Safety Warnings)
.avif)
- Presents eight major, severe adverse effects of Montelukast, including both Rapid reactions like Angioedema and Delayed effects like Suicidal Ideation and Seizures.
- The design uses a powerful, circular layout where each adverse effect is represented by a specific icon (e.g., foot swelling for Vasculitis, brain for Seizures).
Slide 44 - Montelukast Major Complications (Detailed Safety)
.avif)
- Details eight major complications of Montelukast, including risks like Pancreatitis, Angioedema, Seizures, and Suicidal Ideation.
- The design uses eight distinct cards, each featuring a specific icon (e.g., pancreas, face swelling, skull, hand rash) and noting if the reaction is Rapid or Delayed for fast reference.
Slide 45 - Montelukast Moderate Adverse Effects (Timing)
.avif)
- Categorizes the moderate adverse effects of Montelukast based on their onset time: Early (within hours) and Late (within days).
- The design features two prominent, circular icons: a clock and a calendar.
Slide 46 - Montelukast Intermediate Adverse Reactions (Timing)
.avif)
- Classifies the intermediate adverse reactions of Montelukast based on their onset time: those appearing Early (within hours) and those that are Late (within days).
- The design uses two distinct, side-by-side icons—a clock and a calendar.
Slide 47 - Montelukast Moderate Adverse Effects (Symptom List)
.avif)
- Lists and illustrates five specific Moderate Adverse Effects, including Conjunctivitis, Gastritis, Atopic Dermatitis, Memory Impairment, and Hepatitis.
- The slide features a calendar icon and uses five distinct icons to represent each adverse effect (eye, stomach, hand, brain, liver).
Slide 48 - Montelukast Mild to Moderate Side Effect (Symptom Summary)
.avif)
- Summarizes five common Mild to Moderate Side Effects of Montelukast, including Conjunctivitis, Gastritis, Atopic Dermatitis, Memory Impairment, and Hepatitis.
- The slide uses a visually engaging layout where each symptom is represented by a unique, centralized icon (eye, stomach, hand, brain, liver) within a prominent marker, making the list easy to recall.
Slide 49 - Montelukast Mild Adverse Effects (Common Symptoms)
.avif)
- Presents four of the most common Mild Adverse Effects of Montelukast, including Nasal Dripping, Nausea, Headaches, and Fever.
- The design uses four numbered cards, each featuring a specific icon (running nose, headache bolt, thermometer) to visually represent the symptom for quick patient or clinician reference.
Slide 50 - Montelukast Minor Adverse Effects (Common Symptoms)
.avif)
- Presents four specific, common Minor Adverse Effects of Montelukast, including Nasal Dripping, Nausea, Headaches, and Fever.
- The design uses four distinct, vertical callouts, each featuring a simple, clear illustration of a human figure experiencing the symptom for quick visual identification.
Slide 51 - Route of Administration of Montelukast (Formulations)
.avif)
- Presents the three main oral dosage forms available for Montelukast: Tablets, Chewable Tablets, and Granules.
- The design uses a clean, circular Venn-like diagram, each with a corresponding icon (pill, chewable pill, packet).
Slide 52 - Montelukast How It's Used (Formulations Detail)
.avif)
- Details the three primary oral drug forms of Montelukast: Chewable Tablets, Tablets, and Granules.
- The design organizes the three formulations into distinct, numbered cards, each featuring a large icon (chewable pill, scored pill, packet).
Slide 53 - Montelukast Toxicity (Safety Endpoints)
.avif)
- Summarizes the three key preclinical toxicity endpoints evaluated for Montelukast: Mutagenesis, Carcinogenesis, and Impairment of Fertility.
- The design uses three distinct, central cards, each featuring a specific icon (DNA helix, cellular clusters, sperm).
Slide 54 - Montelukast Upper Limit (Dosing by Age)
.avif)
- Presents the Upper Dosing Limits of Montelukast across five key patient populations, from Infants (6 months and older) up to Geriatric patients.
- The design uses five numbered columns, each featuring an icon representing an age group and clearly listing the recommended daily dose in mg/day.
Slide 55 - Montelukast Maximum Dosage
.avif)
- The slide uses a clear, horizontal row of five icons to compare maximum Montelukast dosages across different age groups.
Slide 56 - Montelukast Maximum Limit
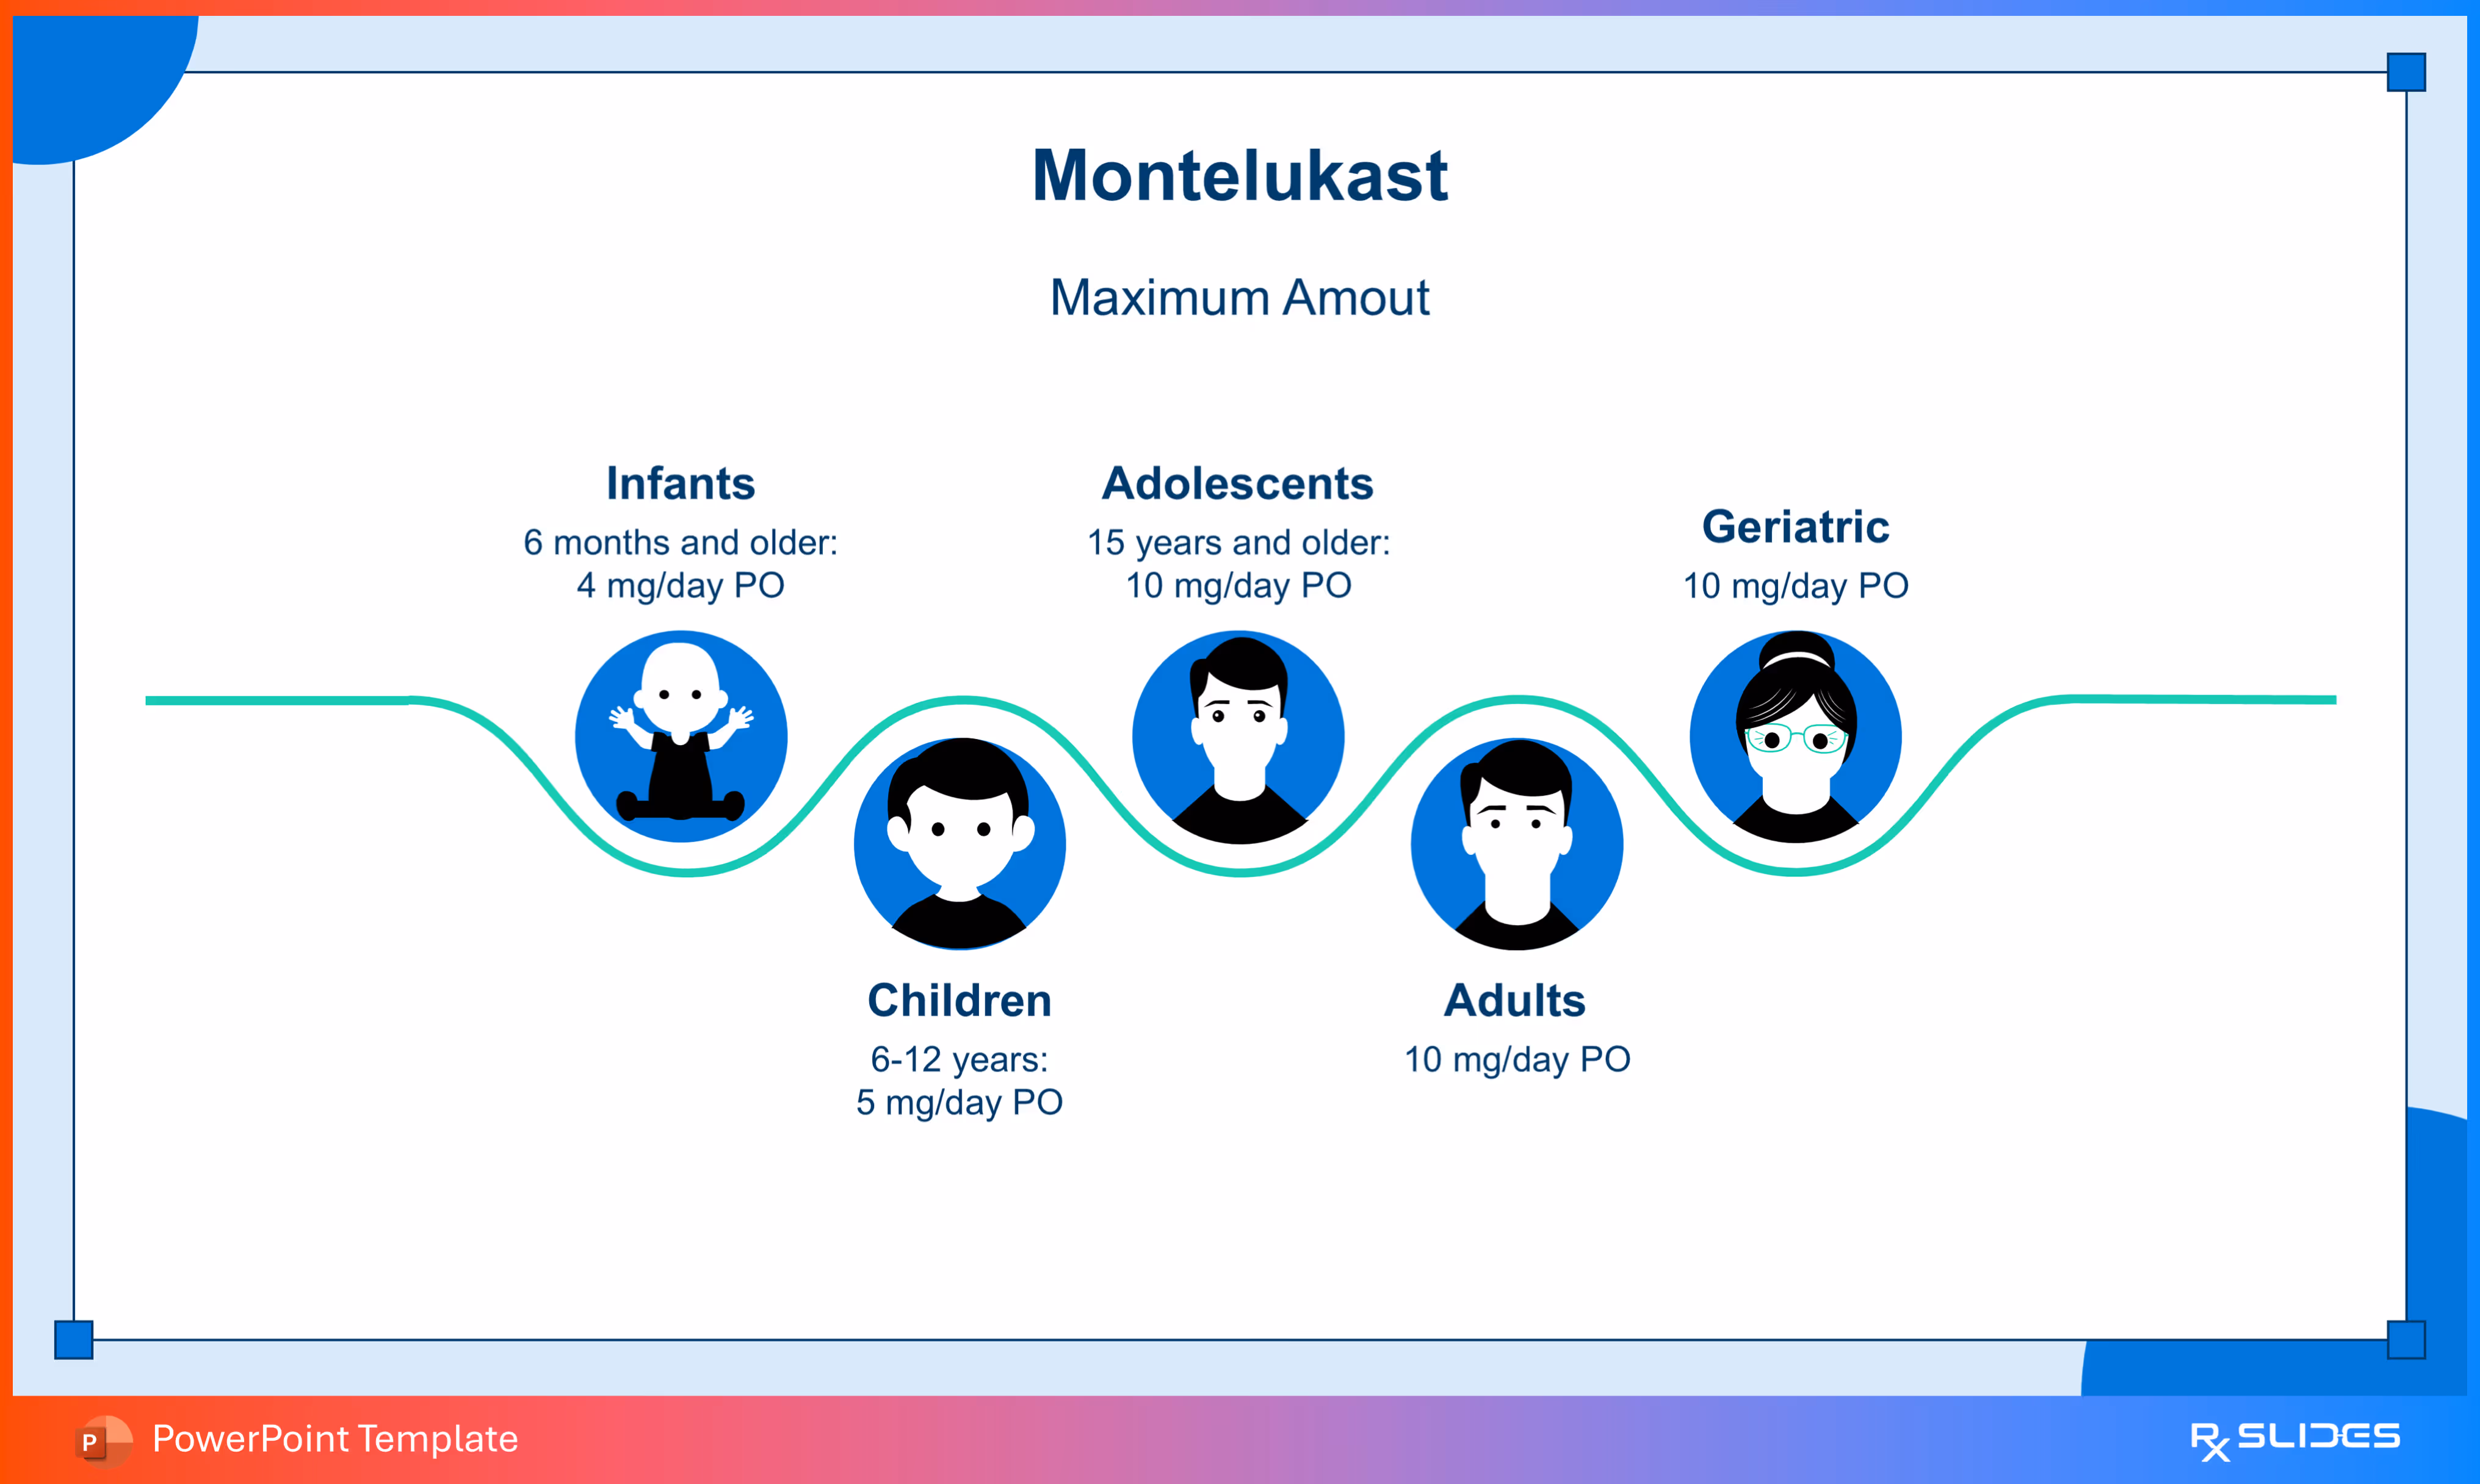
- This slide uses an undulating timeline or wave chart to arrange the five age groups and their corresponding dosages.
Slide 57 - Thank You (Closing Slide)
.avif)
- Concludes the presentation, featuring a clear "Thank you" message and placeholders for the presenter's name and contact information.
- The design incorporates an illustration of the drug granule packet within a circle.
Features of the Template
- 100% editable PowerPoint template.
- Editable colors, you can change according to your presentation style and company branding guidelines.

.avif)

.avif)